


Learn what tools and ingredients you'll need when learning how to make homemade bath bombs as well as why DIY bath bombs are much better than store-bought.
And while homemade bath bombs are easy to customize you can also check out five amazing ways to scent your DIY bath bombs.
What You're In For
Jump To
- When To Use Homemade Bath Bombs
- My Experience With Homemade Bath Bombs
- Why You Should Make Homemade Bath Bombs
- DIY Bath Bombs Ingredients
- A Few Notes & Swaps About The Ingredients
- Essential Oils For Homemade Bath Bombs
- Tricks To Making DIY Bath Bombs (Hacks!)
- The Biggest Secret
- Why Homemade Bath Bombs Are Awesome
- Scent Ideas For Homemade Bath Bombs
- What To Do After The Bath
- The BEST DIY Beauty Products For Busy Moms
- Don't forget to pin these tips on How To Make Bath Bombs!

When To Use Homemade Bath Bombs
Learning how to make homemade bath bombs is an amazing skill to have in your back pocket!
DIY bath bombs are great for:
- calming the kids before bed
- a morning activity/craft to do with pre-teen
- saving money
- homemade gifts
Not only are DIY bath bombs easy to make but you're giving people you care about the opportunity to pamper themselves if you use them for gifts.
DIY bath bombs also means that you can customize them and unique to each person you gift to.
My Experience With Homemade Bath Bombs
Confession: For a long time, I hated homemade bath bombs- seriously! For some reason, I couldn't get them to hold together.
They crumbled, they didn't fizz or something else went wrong with them.
Learning how to make bath bombs at home was not something that came easily to me. They were almost as bad as the epic fail of DIY sugar and soap scrubs. There were a lot of bad batches. A lot.
And being the frugal person I am, I refused to throw out the bad batches which left me with a jar of "random bath bomb fails" I would spoon into my bath.
Since I don't take a whole lot of baths this jar really just hung out in my bathroom for way too long 😛
Since then, I've figured out a few essential tricks when it comes to how to make bath bombs and the perfect homemade bath bomb recipe.
I now have one core formula (below) I use when making DIY bath bombs and teaching my friends how to make homemade bath bombs though I'm sure there are lots others!
What I really want to share with you is the biggest tricks I've learned so you know how to make bath bombs at home easily.
Quick Tip: if you're just getting into DIY beauty or skincare products give the blog post "Everything You Need To Know About Making DIY Products" a read. It solves a lot of questions and is a great starting point for beginners!
Why You Should Make Homemade Bath Bombs
Aside from the fact that DIY bath bombs are far cheaper than store-bought, they're also better for your body!
Store-bought bath bombs are often loaded with fragrances and dyes. These ingredients can cause a slew of harmful effects most commonly talked about are hormone disruptions.
Since companies don't need to disclose ingredients in "fragrance" it really leaves us open to absolutely everything.
Learning how to make your own bath bombs means that you're in control of the ingredients and thus, your health. It's always worth it.
Especially since the term "natural" isn't as regulated. This is exactly why I created a list of natural baby products I used personally because so many of us are confused (and rightly so) as to what is actually healthy!

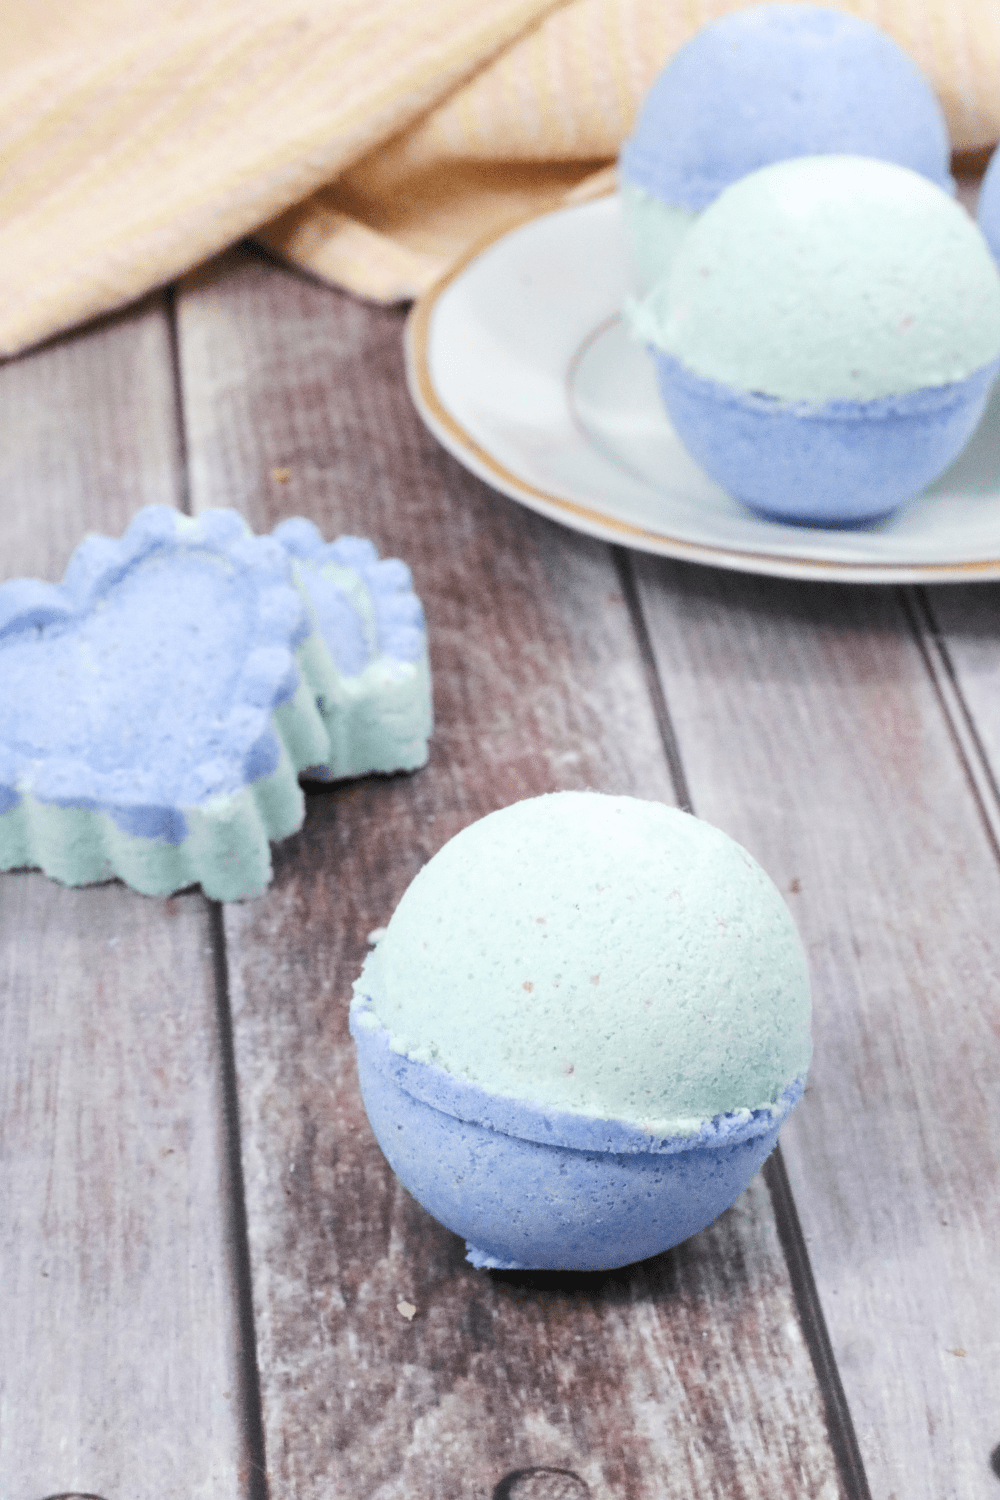
DIY Bath Bombs Ingredients
The ingredients you use in your homemade bath bombs are important. The ratios also took me a long time to figure out.
The list of ingredients below not only helps keep the bath bombs similar to a detox bath but they also ensure maximum fizz.
- 1 cup baking soda
- ½ cup citric acid
- ½ cup Epsom salt
- 2 tbs almond oil
- ¾ cup cornstarch
- 1 teaspoon mica
- 3 teaspoon witch hazel
- 20 drops essential oils (for adults)
- Small spray bottle with water
Here's where you can grab a roundup list of my favorite products (and brands) for DIY beauty products and where to buy them.
A Few Notes & Swaps About The Ingredients
I use mica for coloring because it's a natural mineral and I love the color it brings out!
It's only fair to warn you though that it does leave a nice shimmer in your bathtub. This means you'll probably want to scrub the bath ring afterward or shortly thereafter.
Truth be told, I only do this when I make them for someone else.
For myself, I normally don't color them at all. Or, I just use pink salt (like in these heart-shaped DIY bath bombs) to give a bit of shimmer.
You'll notice I also use almond oil. I find this helps hold the bombs together and also gives a little moisture to your skin!
But again, warning: be careful getting out of the bath because the tub might be a bit slippery.
Lastly, witch hazel. This ingredient has a ton of uses but for homemade bath bombs I find it helps the essential oils really bind to the bombs creating a more potent smell.
A quick tip on molds! You can use any silicone mold for bath bombs (muffins, hearts, minis).
The circle ones I bought I got locally so I don't have a link for them (womp womp) but they're similar to the medium size bath bomb molds.
Lastly, if getting them into the molds is freaking you out, keep in mind that making the mixture and simply portioning it into jars for a gift is amazing too!
Jars make cute homemade gifts and this way people can scoop as much or little as they like.
Essential Oils For Homemade Bath Bombs
When it comes to essential oils for bath bombs, this is a tricky spot.
Obviously, you can opt not to scent them at all. However, more often than not the scent is what makes the bombs!
After far too much research, I choose to use a dilution rate of 10 drops of essential oils to 1 tablespoon of carrier oil. This is roughly a 5% dilution rate (this website states you can use up to 20 drops per tablespoon). So while this would be alright for adults, it’s not something I’d recommend for kids.
For kids, I’ve heard it recommended anywhere from 5-20 drops of essential oils for bath bombs.
So, I prefer to err on the lighter side. When not in the bath, normally a safe dilution would be 0.5-1% of essential oils to carrier oils.
When it comes to homemade bath bombs for kids, I go for 8 drops in total.
In my bath bombs for kids, there’s only 1 tablespoon of oil. You can definitely use more if you feel comfortable!
I never used to think twice about essential oil dilutions. However, being around Lea Jacaobson has made me think twice about what I use and how. My advice? Do your research.
Tricks To Making DIY Bath Bombs (Hacks!)
This is where I always stumbled and failed: I could never for the life of me get the bombs to hold together!
The always crumbled, I could never get them out of the molds and was left with a jar or crumble or very little fizz.
While the above ingredients do make it better here are a few other crucial tips:
- When mixing the wet ingredients into the dry, mix for longer than you think.
- I used to just kind of throw it all together. But if you spend two solid minutes mixing you will notice a damp-like consistency which helps hold the bombs together.
- They won't stick in the bowl and will seem kind of dry but when you press down hard you should notice them get firm. Mix really well and they hold together better.
- Also- the flip. If you're using basic silicone baking molds you can forget this. But if you're making the big round balls, getting the two pieces of the ball together without the contents pouring out can be tricky.
- You have to hold them both sideways and then mash them together. if you try to flip one on top of the other it won't work. Sideways, then into each other. And move fast.
- If you run the baking soda, cornstarch, and salt through a fine mesh strainer only the "soft" ingredients make it into the bombs and it prevents them cracking (another reader gave me this awesome tip!).
Updates:
A reader let me in on a secret she adds the citric acid after the wet ingredients so she's not scrambling and worrying about fizz. Honestly, this is an AMAZING tip.
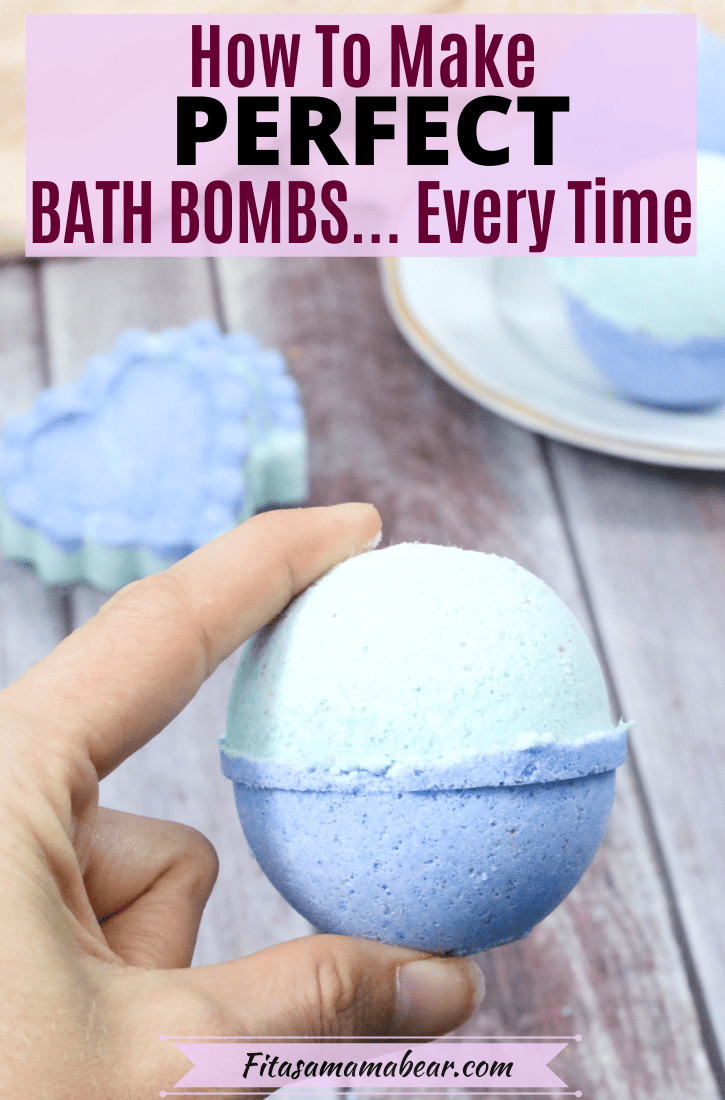
The Biggest Secret
Only fill your mold halfway. Then, using a silicone spatula, firmly press the mixture into the mold as hard as you can.
Spray the top of each bomb ever so lightly with water and repress. Then, fill the mold the rest of the way and repeat (press down, sprat, press down).
You can see a better example of this technique if you check out the in-process images in these stress-relieving bath bombs.
I find I need the double press down or they crumble. There's also a fine line on how much water to spray. 1-2 squirts in a small bottle is perfect.
Any more than that and you begin to lose your fizz as the citric acid reacts with the water.
I can't stress enough.. press down firmly.
You want just enough water that it helps them bind and you notice them look somewhat firm. Any more than that and it's too much.

Why Homemade Bath Bombs Are Awesome
As I mentioned above, when you get them right, DIY bath bombs make a really lovely and thoughtful gift (especially these mini bath bombs for kids!) because you can personalize both the color and the scent.
Bath bombs in a spa store run anywhere from $3-7 Canadian per bomb- which is ridiculous!
Learning to make bath bombs allows you to personalize your gifts and is beyond cheaper to do so. Plus, most of the ingredients in bath bombs are also part of a detox bath so the bombs can be really effective!
These bath bombs are perfect if you need to relax after a long day and get some rest. They help ease both your body and your mind into a relaxed state and prepare you for sleep.
- 10 drops lavender
- 15 drops chamomile
- 5 drops breathe (DoTerra specific blend)
This blend promotes happiness, clarity and calming properties which will help ease away tension.
- 8-10 drops lavender essential oil
- 8 drops grapefruit
- 12 drops orange/citrus
- 5 drops chamomile
- 5 drops clary sage
Perfect if you need a bit of happiness sprung your way. These bombs make you feel light, energized and content.
- 10 drops citrus bliss essential oil
- 5 drops wild orange
- 5 drops lemongrass
Energizer Bath Bombs
These oils have been shown to release tension, stress and boost your alertness they also help to give your mood a bit of a boost.
- 15 drops lemon oil
- 5 drops peppermint oil
These bombs promote relaxation, help relieve tension, and help you slowly relax and unwind.
- 10 drops lavender essential oil
- 10 drops peppermint essential oil

What To Do After The Bath
Of course, getting your of the bath is the perfect time to slather up with some homemade lotion!
The BEST DIY Beauty Products For Busy Moms
Packed with quick, natural recipes that fit seamlessly into your busy mom life, giving you safe, glowing skin without the hassle!
The DIY Beauty Ebook For Busy Moms contains 21 easy-to-make beauty recipes from lip chaps, to lotions, and scrubs to washes.

You'll also learn the exact tricks I stumbled through on my journey and how to avoid them.
And BONUS, if you're into the self care vibe, this bundle comes with a guide to start journaling, tips to make self-care a habit, as well as the grocery list you need to make everything.. all for just $9.99.
Don't forget to pin these tips on How To Make Bath Bombs!
Learning how to make bath bombs at home is one of the easiest, most cost-effective homemade gifts you can make for family and friends.
They're simple, pretty, and best of all.. perfectly unique to the individual.
Whip up batches of different scents and show your friends how well you know them- everyone needs a bit of pampering!


Kimberly Rice says
How many bath bombs does your recipe make?
Shelby Stover says
My typical recipe makes four when I'm using the big round molds or 6 when I use a silicone flat mold.
JM says
I tried the trick about mixing the wet ingredients longer and the result is very nice. I will give this as a personalized gifts for my friend's birthday next week.
Jennifer says
After putting mine in the molds some are starting to rise and really expand. Should I keep pressing the mixture down or let it rise?
fitasamamabear says
Hrm, sounds like they reacted early. Definitely still push down. Bath bombs are finicky and it's a delicate balance of when to add liquid. If you're having trouble, one thing I do sometimes is only add half the citric acid, then the liquid, stir and then the remaining citric acid. This way it doesn't remove all the fizz. FYI if they expand into blobs in the mold, they won't look pretty and they'll be a "squishy hard" but they do still work in the bath.
Hannah says
Please put this in a printable recipe format! I am saving some of your recipes to make Christmas gifts and it is so much easier to print it and take it with me to the kitchen.
fitasamamabear says
Noted. I'll try to get to it but it won't be for another week or two!
fitasamamabear says
Noted. I'll try to get it but it won't be for another week or two. if you go to the individual recipes though, there are printable versions 🙂
Alexandra says
Hi I'm planning to try making bath bombs in a small star shape mold using your recipe, how long should i let them settle before removing them from the mold. It's silicone mold from amazon. Also would storing them in a mason jar afterwards be ok? I'm hoping to start a small side business/hobby from home to bring in extra funds and feel like i can really do this so would appreciate any tips or tricks you are willing to share. Thank you for your time.
fitasamamabear says
Hey Alexandra!
You want to let the bombs sit for a full 24 hours- otherwise, they won't harden and stick together. Keep in mind it might take some trial and error on how much/little to spray the bombs to hold together optimally. You want to really press them down and fill the molds almost in quarters (while pressing) so that they hold! You can store them in a mason jar, I do know that sometimes they stick together a bit though but normally they're just fine. If you have any questions or need to troubleshoot feel free to reach out!
Cheryl Smaciarz says
I was wondering about when you take them out of the mold? I made these yesterday, took them out of the mold right away, put them on a plate to dry, I thought, and bu morning they were all hard and spread out into a bunch of blobs and stuck to the plate. Of course, I pried them apart and packaged them for myself.
fitasamamabear says
Hey Cheryl,
I typically don't recommend taking them out of the molds for a solid 24 hours. Otherwise they're more prone to be sticky or even crumble. Basically, they're not fully set and nothing has had time to harden. I've taken mine out within 10-12 hours and they're still messy. So wait a good day if you can!
LaNora says
I thoroughly enjoy making Bath Bombs!!! I just thought I would maybe help out with the Mica Color not mixing with the oils and dispersing with the bomb just floating to the surface, you can add Polysorbate 80 which I found online will allow the mica to dissolve with the bomb with no residue left behind.
I am always looking for new techniques to improve my experience at making bath products thank you for sharing
fitasamamabear says
I love that you enjoy them! They're such a fun project. THANK YOU for the tip on Polysoorbate I've never really looked into that aspect. It would be freaking magical to not have the mica stain anything- amazing tip!
Nichole Fritz says
Hey there! I am a special ed teacher for 18 and older and we are trying to make bath bombs to sell for our program. I have tried your recipe 5 times now and the bombs are not holding together! I have tried our failed attempts in the water and they seem to be doing what they are supposed to. nice fizzle and scent. I am about to give up on molds and just pour product into a canister and sell it like that.
Any other suggestions for me? I really want to make heart shaped bombs for valentines day.
fitasamamabear says
Hey Nicole! From my experience when bath bombs don't hold together (which definitely happens because they're finicky) it's due to two things: the binder (arrowroot or cornstarch) or the pressing method. First, just confirm you're using the right amount of cornstarch/arrwroot. And it's really well mixed in. The second part in holding them together is how you portion them out. If you fill the mold most of the way, then spray and press they won't work: Do it in parts. Fill the mold 1/4-1/3 with mixture, press down firmly, spray, fill another tablespoon or so per mold, press, spray, repeat.
More often than not it's the pressing/spray that is making them crumbly. It takes some practice. One more thing to note: if you're using chunky Empsom salt that can make a difference (too much surface area). Finely ground works better!
Let me know if the troubleshooting helps and if not, I'll see if I send you a quick video! For reference I normally portion/press/spray about four times per mold.
Tanya says
A tip - Run Epsom Salt, Baking Soda and Cornstarch through sifter. The softer dry ingredients will help to stop the cracking
fitasamamabear says
Ohhh LOVE this! Making a note now in the post- thanks for the hack!
Donna says
I used plastic mold but can’t get them out of the mold.
fitasamamabear says
I've never used a full-on plastic mold, the one I have has a special "press point" for the bombs to pop out. My best advice is just to push in on the plastic to try and loosen a bit, they should *hopefully* pop!
Kara says
My bath bombs keep cracking. Some of them look perfect when come out but when dry they crack or they won’t stick together in mold. I tried plastic molds , and metal ones and nothing seems to be working.
fitasamamabear says
Bath bombs are FINICKY. I'll be the first to admit it took me a silly long time to get them. the trick I've found with cracking is multiple spraying. So, fill the half mold 1/4 way, spray 2-3 times and press it down, fill 2/3 of the way, spray and press down, overfill the half mold, press, spray press. Reapeat on the other half of the mold. Then give it a few more sprays before you jam the two halves together. That sounds complicated but does it make sense? Literally, spraying between pressing them so many times is what saves mine. It could be the liquid to powder ratio is off too but I doubt it. if they're holding together somewhat but not fully, try spraying more!
Amy S. says
I find if I mix all the dry (except the citric acid) and wet ingredients together thoroughly and THEN add the citric acid I don't have to worry about adding the liquid to quickly and making it fizz while mixing. My family is a fan of just leaving it loose in a pretty jar in the bathroom. No worries about packing it 🙂
fitasamamabear says
Your family is my favorite haha truth be told- I do that a lot too. It's SO much easier and jars make cute gifts! That's a really awesome tip though that I hadn't even thought off- thank you bunches!
Emily says
The anxiety reducing ones look amazing!!
fitasamamabear says
Thank you- they really do smell good!