
Target your back, chest, and arms in just one session. This upper body band workout is a great way to strengthen the muscles you need to make daily tasks easier.
Resistance bands are a staple in my workouts because they help clients get stronger at home without the risk of injury. And workouts like this upper body one can be squeezed into any busy schedule to keep you on top of your goals.
"Ooh, I loved this one so much - thank you Shelby. It may be only 15 minutes - but you sure can feel it! Can't wait to see my upper body strength build as I continue with it consistently 😀 x." - Ella

Benefits Of The Upper Body Workout
Done in 15 minutes so that it easily fits into your busy schedule
Requires only a resistance band so that you can do it at home while still reaping the benefits of strength training.
Helps to strengthen and tone the arms and upper body so that you can lift your kids and feel more confident.
Muscles Worked
Expect to feel some tension and possibly some muscle soreness the next day in the following areas:
- Upper back
- Triceps
- Chest
- Shoulders
- Biceps
The Upper Body Band Workout
Don't forget to make sure your form is spot on and that you're activating the upper body muscles you should be!
One of my goals for my moms in the SMASH home workouts is to make sure they know how to move the shoulder blades and not just bend the elbows (these thoracic spine exercises help).
Perform each exercise without rest in order for the reps seen in the video.
At the end of the exercises, take a 45s break and repeat the circuit for a total of 3-4 rounds.
| Single arm shoulder press | 8/arm |
| Band Row | 10 |
| Leg Raises | 10 |
| Band Pull Apart | 10 overhand + 10 underhand |
| Push Ups | 8 |
| Plank | 30 seconds |
| Rest | 45 seconds |
Need help getting started?
Check out the Busy Mom's ULTIMATE GUIDE To Working Out At Home. I created this guide to give moms everything they need to start working out at home.
This blog post answers many common questions moms have when starting a workout routine- so you can get started, the right way!
The Workout PDF Printable
Below is a PDF of the workouts for you to download (click the image). Here, you can record your weights and any notes.
Mark down the workouts and then as you go through them week by week strive to progress them by upping your weight, improving your form, or getting through the sets faster.
Want over 20 printable home workouts without any ads? Check out these Printable Power Workouts. All kinds of workouts to help you kick off your fitness journey right in one spot.

Choosing A Resistance Band
These exercises use just a red strength band to get the job done.
Strength resistance bands are one of my favorite pieces of at-home gym equipment. They’re small, cost-effective, and provide an added bit of resistance to your exercises.
In fact, in the SMASH Fit For Life workout programs, I only require my clients to have a mini loop band and a set of dumbbells! So yes, resistance bands are effective.
Make sure to grab looped resistance bands though (full circle) and not pilates resistance bands. You’ll get better bang for your buck this way.

Create a stronger, healthier you with minimal space and money! Check out the 4 best home workout equipment to rock your at-home fitness journey.
Tips To Perform The Band Workout Correctly
Below you'll find a breakdown of the resistance band exercises you'll see in the workout. Remember that form is crucial to progress when it comes to home workouts. Slow down and make every repetition COUNT.
Single Arm Band Press
Stand in a staggard stance with the resistance band hooked under one foot and with it in the palm of your hand by your shoulder.
Brace the core and press the band overhead trying not to flare the ribs. Pause briefly as the arm is fully extended and return to the starting position.
Remember:
- Keep ribs tucked
- Fully extend the elbow

Resistance Band Row
Sit on the floor with legs straight in front of you and the band hooked around your feet (toes up).
Hold the band in your arms straight out from you. Sit tall as you pull your hands back toward your shoulders by pinching the shoulder blades together on your back. Pause and release the band.
Remember:
- Sit upright
- Keep shoulders away from ears
- Pinch the shoulder in when pulling back

Leg Raises
Lay flat on your back with your legs extended in the air. Tuck your ribs down and slowly lower the legs toward the floor.
As you do, keep the core tight and the back pressed into the floor with a minor pelvic tilt.
If your back begins to arch, you've gone too far. Bring the legs back up toward the starting position.
Remember:
- Maintain a pelvic tilt and only go as low as you can hold it
- Engage glutes as hips open

Band Pull-Apart
Standing upright with knees slightly bent, hold the resistance band in your hands with the palms facing down.
Slightly bend the elbows. Open up the arms against the tension of the band as if you were hugging a tree.
Keep the elbows slightly bent and move the shoulder blades on your back. Pause briefly and bring the hands back in front of you.
Remember:
- Do not flare the ribs
- Move through the shoulder blades
- Keep a slight bend in the elbow

Push-Ups
Start in a plank position with your hands in line and ever so slightly wider than your shoulders.
Squeeze the glutes and ensure the front core muscles are engaged. Tuck the elbows back as you lower your body towards the floor keeping the neck neutral.
Pause briefly at the bottom before reversing the movement and returning to the starting position.
Remember:
- Tuck Elbows tight
- Shoulder over wrists
- Maintain a minor pelvic tilt
Trouble with push-ups? learn more about improving your push ups in four easy steps.

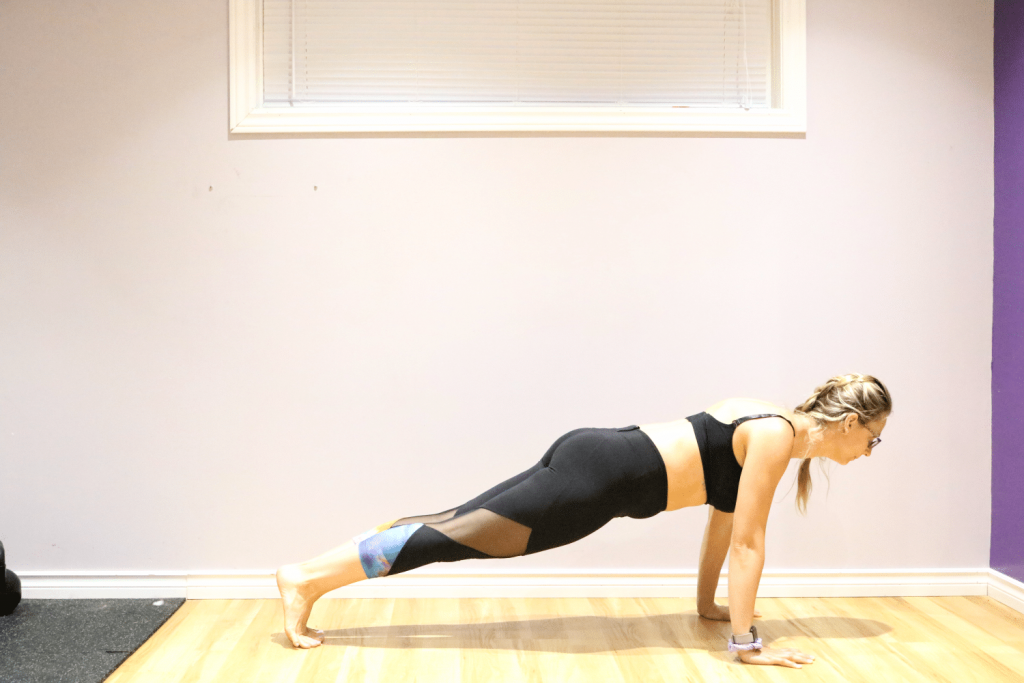
Plank
Place your hands on the floor under your shoulders and come up onto your toes so that your body makes one straight line.
Squeeze the glutes and keep your neck neutral. Tuck the ribcage down.
There should be pressure in your belly and your entire body should be tight. Hold.
Remember:
- Do not arch low back
- Keep a neutral neck
- Do not shrug shoulders
Ditch the All-or-Nothing Trap
The Kickstart & Thrive Bundle is where busy moms keep things simple with quick, strength-building workouts you can actually fit into your day, plus protein-packed snacks that give you energy and taste like dessert but don't add extra time in the kitchen.

Frequently Asked Questions About Upper Body Workouts
Fitness results don't always come from the duration of your workouts but the intensity. So long as you are using quality repetitions, focusing on muscle activation, and progressing your workouts over time, 15 minutes is lots of time to challenge your muscles, especially your upper arms, and see results.
It is definitely possible to build muscle with short workouts. The goal is to ensure that you make every repetition count, keep constant tension on the upper body, and slowly progress your workout intensity over time.
Use this workout twice per week (not on back to back days). For a well-rounded approach, pair it with a beginner leg workout so that you have a good upper and lower split.

More Fitness Tips To Help You Smash Goals
- The best exercises for your back
- Back and bicep workout
- Triceps workout at home without dumbbells
- How to do a push up in four easy steps
- Wicked tricep exercises you're missing
- How to get stronger using pause reps
- How to increase the intensity of your workouts without adding weight
- 4 core exercises better than sit ups
- Resistance training tips for beginners
- At home workouts to follow along to


Marie says
Did a couple of these exercises and my arms and shoulders felt great afterward. The band pull-apart exercise was great for my back. It really helped me feel more stable and strong.
Ella says
Ooh, I loved this one so much - thank you Shelby. It may be only 15 minutes - but you sure can feel it! Can't wait to see my upper body strength build as I continue with it consistently 😀 x
fitasamamabear says
15 minutes is all you need!