
Thoracic Spine Exercises For Mobility are essential if you’re dealing with stiffness, poor posture, or recurring upper-body tension. The thoracic spine (mid-back) is designed to move, but modern life keeps it locked up, which creates discomfort and injury. These simple but powerful exercises help improve mobility, reduce pain, and boost performance.

Thoracic spine mobility exercises are movements that improve the movement of your upper and mid-back, helping reduce stiffness, improve posture, and prevent pain.
Sp, what if I told you that you could reduce your neck and back pain, carry easier, move better, and reduce your injury risk in just 5 minutes per day? But this is something I see all the time with clients, and what I help improve inside my Mobility Made Simple program.
Sounds to good to be true, right?
Let me tell you that prioritizing thoracic spine exercises (along with upper back exercises with bands) can make those differences.
You don’t need to be an athlete to improve this area. These thoracic spine mobility exercises are for anyone looking to maintain good posture and move optimally while keeping their spine healthy long term. In fact, they're the exact ones I use in my at-home workout programs.
And the best part is that working on thoracic mobility can be done just about anywhere (check out this upper body mobility list on YouTube for follow-along sessions).
Jump To
What is The Thoracic Spine?
The thoracic spine is the middle portion of your back, running from your neck to your lower back. There are 12 vertebrae in the thoracic area.
It plays a key role in posture, breathing, and upper body movement, allowing you to extend, rotate, and move your upper back properly. Generally, the thoracic spine should extend, flex, rotate, and lateral flex.
When this area becomes stiff (which is common from sitting and poor posture), it can affect everything from how you move to how you feel day to day. Mobility in this area is especially important in healing diastasis recti years later.
Why Your Thoracic Spine Gets Stiff
Your upper back gets stiff because... we stop moving it! Our day-to-day activities don't engage as much as they should, and so we lose movement.
- Sitting and hunching forward all day
- Lack of rotation in daily movement
- Overusing the lower back instead
- Poor posture habits (especially for moms which is why breastfeeding stretches are so important)
Benefits Of Thoracic Spine Mobility
Keeping your thoracic spine (or T-spine) mobile has a big impact on how your body feels and moves day to day. Some of the biggest benefits include:
- Improved posture
- Less low back and neck pain
- Less injury risk (specifically with the shoulder)
- Being able to move well as you age
Part of this is due to our daily nature to hunch over things and the problem is that once we begin to use poor movement patterns, we then use our low back too much (which can then cause pain and injury). This is why a 10-minute mobility reset can help so much.
Mobility Exercises For The Thoracic Spine
These thoracic spine mobility exercises are beginner-friendly and can be done on their own or as part of a short daily routine.
They can be done on their own or worked into a mini mobility session you can do daily. These are a blend of thoracic extension exercises and thoracic rotation exercises, but all of them are dynamic mobility drills which means you’re moving through the exercises.
Remember that your thoracic spine is meant to extend and rotate, so focus on that area and not performing the movement in the low back.
As you go through them, focus on moving through your upper back (not your lower back) and stay controlled. Some may feel stiff at first, but that’s normal, and improves with consistency.
1. Cat Cow
A simple but effective movement that improves thoracic mobility, when done with control and focus.
- Come onto all fours with your hands directly under your shoulders.
- Round your upper back toward the ceiling (not just the lower back!).
- Pause, and the press your chest to the floor to extend the upper back.
- Make sure to take care not to perform the movement solely through the lumbar spine.
Cue: Move from your upper back, not your lower back, think “round and extend through your chest.
Resp: Perform these for 10-15 repetitions.

2. Thread The Kneedle
This move can be done from a tabletop position (all fours) or a child's pose position. Both are great ways to target thoracic rotation though the childs pose version can be more intense.
- Come into a table top position on your hands and knees.
- Take your right arm and thread it through the gap between your legs and your left arm.
- Place the right shoulder on the floor and look to the left. Pause.
- Twist from your upper back and not your lower back so that you feel the stretch in the back of your right shoulder.
- Bring the arm back up toward the ceiling and repeat.
Use the floor as resistance to twist from the upper back while keeping the hips squared so that the low back is not twisting.
Cue: Keep your hips still and rotate only through your upper back.
Reps: Perform 10 repetitions on each side.

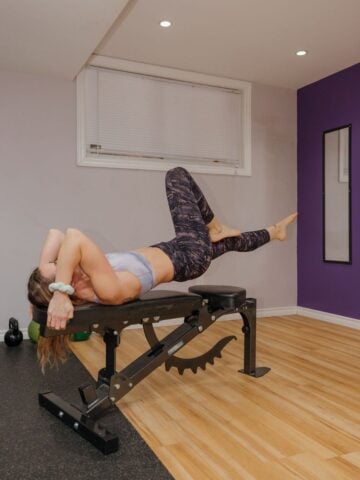
3. Weighted Pullovers
A strength-based movement that improves thoracic extension while also training the upper body. It's actually a favorite of mine in any diastasis recti workout.
- Lay on your back with your knees bent or straight (bent is easier and better for beginners).
- Tuck your ribs down toward your hips and raise your arms straight out from your shoulders.
- Grab a yoga block and slowly bring the arms toward the ground behind your head.
- Take care not to flare your ribs or upper back.
- Bring the arms back up and repeat.
Start with a yoga block and progress to small weights.
Keeping the knees bent makes this easier. Really focus on engaging the internal core muscles. Use a yoga block as “weight” to start and slowly scale up. Also, REALLY ensure the rib cage stays down. If it comes up, you’ve gone too far.
Reps: Repeat for a total of 15 repetitions
Cue: Keep your ribs down, if they flare, you’ve gone too far.

4. Wall Pulses
A targeted mobility drill that helps open up the chest and improve upper back extension using the wall as resistance.
- Stand a foot away from the wall and place your palms flat on the wall at head height.
- Keeping your low back locked in, press your chest toward the floor and sink the heels down.
- Do not arch the low back. Aim to extend the upper back and feel a stretch in the underarms.
- Come back up to the starting position and repeat.
Reps: Perform for 12 repetitions
Cue: Sink your chest down without arching your lower back.

5. Lunge Rotations
For this mobility drill, remember that the upper back is made to rotate, not the lower back. It's a dynamic movement that builds thoracic rotation while improving coordination and control.
- Come into a plank position.
- Bring the right foot up toward the right hand and place the heel on the floor.
- Drop the back knee to the ground.
- Light the right arm and twist the body into the front knee stretching the chest toward the sky.
- Bring the arm back down and repeat on the same side before switching.
Cue: Rotate through your chest, not your hips or low back.
Reps: Perform for 8 repetitions on each side.

6. Thoracic Openers
A controlled stretch that increases upper back rotation without stressing the lower back. This T-spine exercise is one I think most people should be doing nightly before bed.
- Lay on your right side with your knees bent at hip level.
- Place your arms together straight out from your shoulders on the floor.
- Place a pillow or yoga block between your knees.
- Without moving your hips (keep them squared and facing forward), open your left arm toward the opposite floor.
- Twist from the upper back, not the lower back.
- Bring the arm back to the other and repeat.
Make sure the knees stay stacked, and hips face forward to ensure movement in the upper and not lower back.
Reps: Perform for 30 seconds on each side.
Cue: Keep your knees stacked and let the twist come from your upper back only.
7. Side Lying Circles
A smooth, controlled movement that improves mobility and coordination through the upper spine.
- Lay on your right side with your knees bent at hip level.
- Place your arms together straight out from your shoulders on the floor.
- Place a pillow or yoga block between your knees.
- Without moving your hips (keep them squared and facing forward), draw a circle from your bottom hand up and around your head and to the other side with the top hand.
- While you draw the circle rotate through with the thoracic spine keeping you neck in line and following the moving hand.
Reps: Perform 6 repetitions on each side. See the video above for the drill.
Cue: Follow your hand with your eyes and keep the movement smooth and controlled.
8. Floor Angels
A posture-focused exercise that strengthens the upper back while improving mobility.
- Lay flat on the floor. If you find that you naturally extend the low back, bend your knees.
- Tuck the rib cage down into a neutral position.
- Place your hands' palms up on the floor with the elbows bent at ninety degrees.
- Slowly extend your arms above your head keeping the wrists and low back on the floor at all times.
Cue: Keep your lower back pressed down, don’t let it arch as your arms move.
Reps: Repeat for a total of 12 repetitions

9. Foam Roller Thoracic Extension
For this mobility drill you do need a foam roller and a dowel and this exercise is a great one to help counteract hours of sitting.
- Lay with your upper back on the foam roller (have the foam roller toward the top of your upper back).
- Hips on the floor and tucked low back (no arching).
- Hold the dowel in your hands and slowly try to touch the dowel toward the floor.
- Bring it back up and repeat for 5 repetitions before moving the foam roller lower on your thoracic spine.
Reps: Do this for three separate areas on the spine with 5 repetitions at each.
Cue: Extend over the roller without flaring your ribs or lifting your hips.

10. Wall Rotations
This mobility drill is an advanced one and should only be done once you’ve got some movement. Move slow to nail the form down.
- Come into a half kneeling position next to a wall with your front leg bent (heel on the floor).
- Place your finger tips at your ears and the elbow closest to the wall, on the wall with your upper back close to the wall.
- Keeping the hips table, try to draw a circle with the elbow on the wall from the front of the knee to the glute behind you.
- Bring it back and repeat
Cue: Keep your hips locked in place; only your upper back should move.
Reps: Perform 5 circles on each side. The closer to the wall you are the harder this is.

How Often Should You Do Thoracic Exercises?
Thoracic spine mobility exercises don’t require heavy weights or even equipment. They’re low-impact and great for beginners (like this total body mobility drill).
To improve your thoracic mobility, I’d recommend doing thoracic mobility drills daily.
Working the exercises below into a circuit can be done in under 5 minutes per day. This beginner hip mobility is a great one to start with as well, if you have sticky hips.
If you’re tired of piecing mobility together, that’s exactly what Mobility Made Simple is for. It’s designed for busy moms who feel stiff, tight, and short on time and want quick, effective routines they can actually stick with.
Thoracic Spine Mobility FAQs
Though there are specific thoracic spine mobility drills you can do. However, the truth is that you generally just need to move more. The old saying “if you don’t use it you’ll lose it” is especially true for this area. Move more and make it a priority to add in thoracic spine drills for a few minutes each day.
The first area to strengthen the thoracic spine is to ensure that you have adequate moblity in that area so that you can take it through a good range of motion. From there, exercises I-Y-Ts in a variety of positions are a great way to start.
A great way to gain movement in the thoracic spine is to use a combination of dynamic mobility drills and static stretches. To stretch your thoracic spine come into an elevated childs pose on a bench or couch or perform something like the inverted cat stretch.


Leave a Reply