

As far as crucial movements go, learning how to hip hinge correctly is at the top for moms. The hip hinge is the movement of breaking at the hips (versus the knees as in a squat) and by training a proper hip hinge it helps strengthen the posterior chain (learn more about the posterior chain and the best back of body exercises).
For moms specifically, it helps create a strong low back when picking up kids.

While I am a huge advocate for training the glutes muscles, I really believe in having a strong posterior chain as a whole.
Strengthening the back of the body helps:
- make daily tasks easier
- reduce back pain (learn more about exercises and causes for low back pain)
- helps moms pick up kids without injuring themselves
- improves posture
- allows moms to do the things they love (work out, play with kids etc).
And many posterior chain exercises initiate with a hip hinge. This means, if you don't know how to perform this movement, you'll see little benefit to many exercises.
Learning to hip hinge is the biggest bang for your buck when it comes to not injuring yourself while you pick something up.
What Is A Hip Hinge?
Hip hinging is the act of breaking at the hips while maintaining a good back posture (neutral spine).
You're moving the hip joint through its expected range of motion. So basically, properly bending over and picking things up or swinging something.
Some crucial form points:
- The knees have a slight bend in them
- The upper back needs to remain flat (extended thoracic spine)
- Shoulders are engaged and pulled away from the ears and back on the body
- Neck is neutral
When done correctly, you should feel a stretch in the back of the legs (hamstrings). The reason I love this exercise is that if you don't feel that stretch you're in the wrong position.
This exercise gives you instant feedback. If you don't feel it immediately, your form is off.
When done properly and with a neutral spine, the hip hinge targets almost every single muscle on the back of the body. From your calves to your upper back.
3 Beginner Hip Hinge Exercises
- Hinging with a dowel on your back
- Bodyweight hip hinge to a wall
- Loaded Romanian Deadlift
These beginner exercises build on each other so that you can master the hip hinge exercise.
Below are three progressions to learning and begin using the hip hinge. These drills start out simple and teach the basics (just how to hip hinge) and then scale up to using the hip hinge in a workout.
Until you truly master the technique of hinging from the hips, no external load should be given. Otherwise, you're at more of a risk to injure the back than help it! Learn, practice, and perfect the basics before jumping into anything intense.
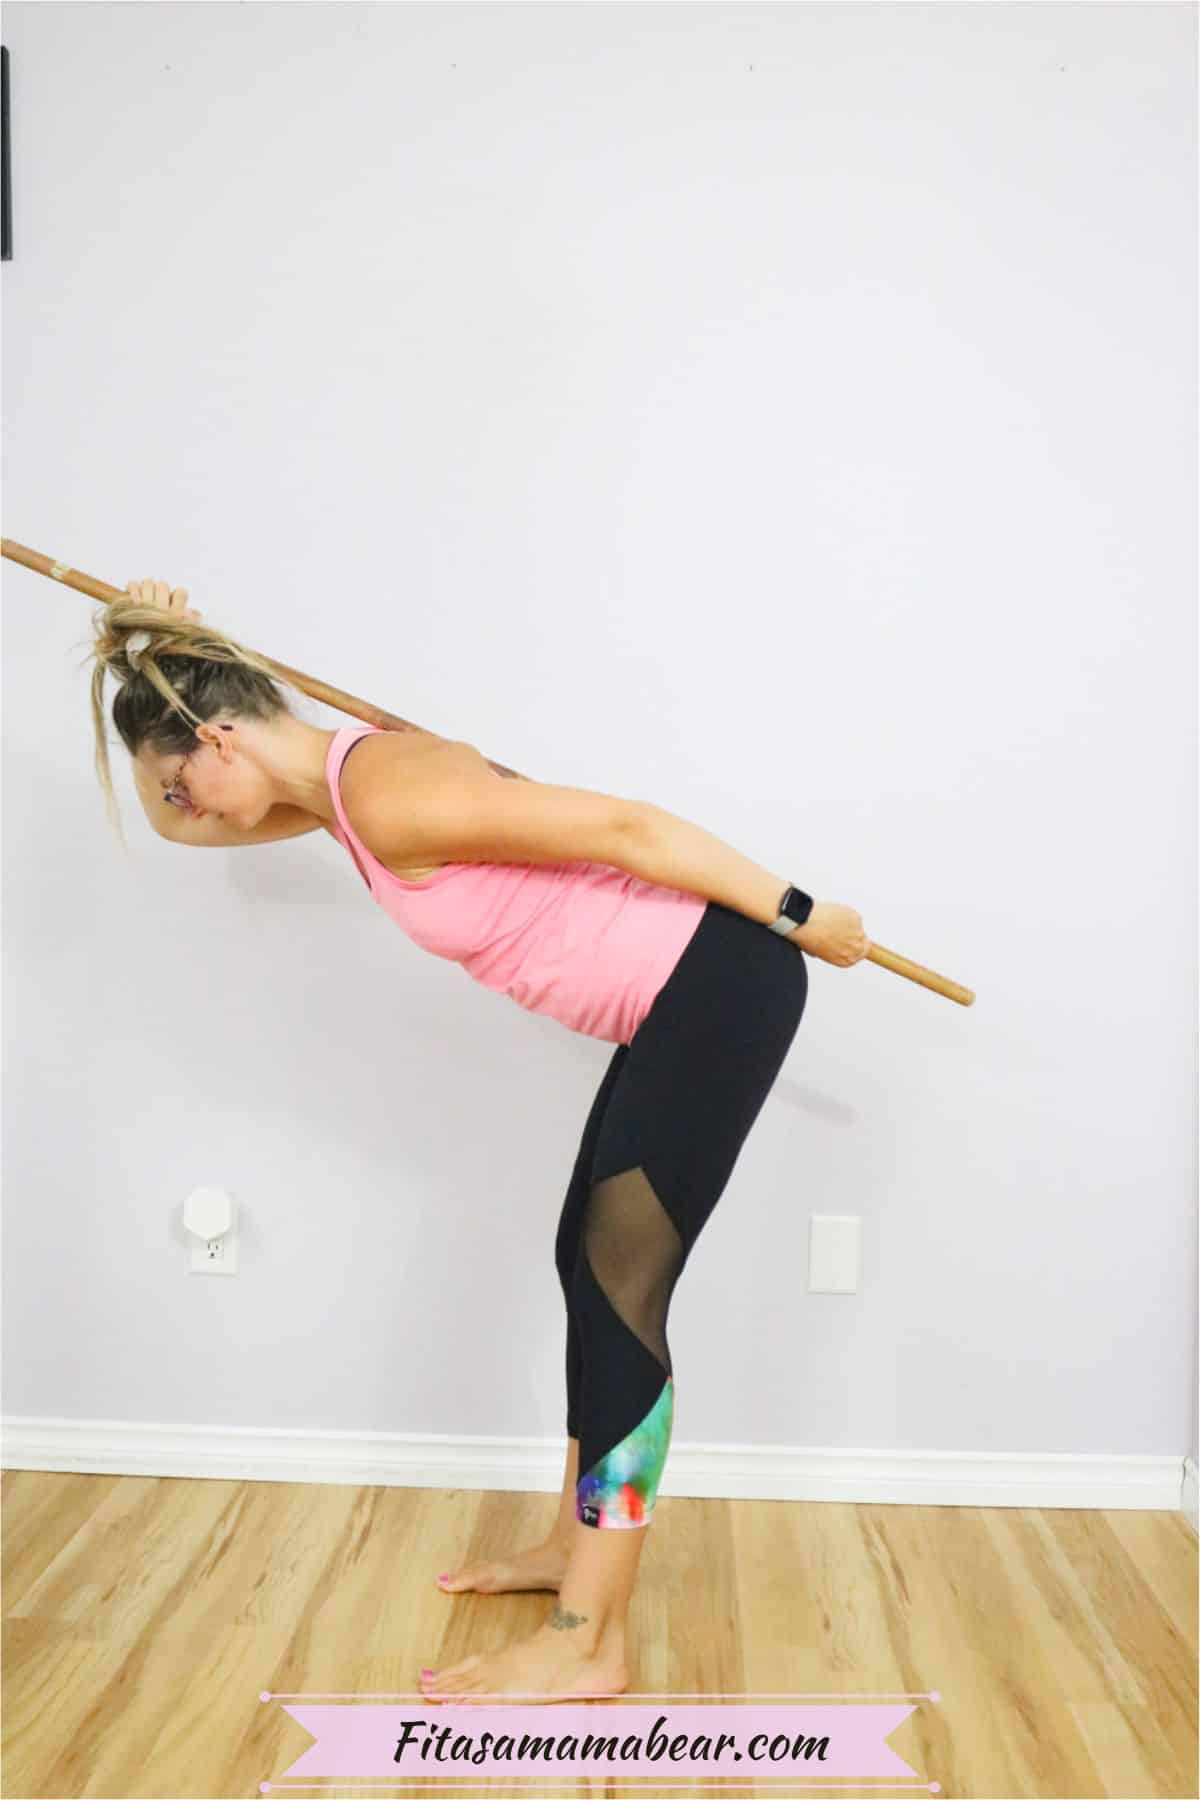
Hip Hinge Exercise #1 Dowel Hip Hinge
This first drill isn't to get you working hard, it's to teach you how to hip hinge and move through the hip joint. Standing upright, place a dowel (broom/swiffer/mop) along your back securing it with your hands.
Ensure the dowel has three contact points:
- your tailbone
- your upper back
- the back of your head.
Only when the dowel is touching all three points is your body in the proper position. The trick to this exercise is that the dowel presses into those contact points through the entire movement.
- To begin the movement, break at the hips and start to sink backward. Stick your bum out as far back as you can. As you do this, keep a slight bend in your knees but do not flex them further (otherwise you're squatting).
- While sinking backward your torso will begin to come towards the floor. As it does, make sure all three contact points stay in touch. If at any time one has come off then you're no longer in the proper position.
- Hinge forward until you are almost parallel to the floor or you lose a contact point. You should feel a stretch in the hamstrings. If the dowel is missing a contact point go back and figure out at what point you lost it and work to improve that range.
- At the bottom, keeping the weight in the heels reverse the movement thrusting the hips forward (still maintaining a slight bend in the knees) and returning to a standing position, still with the contact points intact.
Placing a dowel on the contact points allows you to really see at what point in the movement your form breaks and work to correct it.
Until you can do eight repetitions without losing touch with the dowel do not move on to the next drill. Master the basics first.
Hip Hinge Exercise #2 Bodyweight Romanian Deadlift To A Wall
Once you learn the basic hip hinge and feel comfortable with the movement pattern, you can move up to using your bodyweight (specifically the placement of the arms) as resistance.
Modifying the exercise with your arms provides a bit of a different load and challenge to the body as you strive for perfect form.
- To begin, stand upright and place your arms palms up on your lower back. This is the easiest variation because the "load" is behind you.
- Place your feet a few inches out from a wall.
- From there perform a hip hinge just as you did with the dowel. Break at the hips, sink the bum backward, pull the shoulder blades back, and bring the torso towards the floor.
- As you sink back, your bum should tap the wall. When it taps the wall and you feel a stretch in your hamstrings, pull through the heels using the glutes and hamstrings to pull your body back up into an upright position.
Repeat for a total of ten repetitions.
After the ten repetitions, you should be feeling warm in the back of the body specifically the hamstrings.
Arm Progressions
- try with your fingertips touching your ears (hands by your head which shifts your weight forward)
- Cross your arms over your chest (again a forward shift in the weight you need to control)
When you can perform 2 sets with the hardest variation you are ready for the full exercise.

Hip Hinge Exercise #3 Weighted Romanian Deadlift
The romanian deadlift is a staple in many training programs because it is just that effective in targeting, improving, and strengthening the posterior chain.
This movement can be done with dumbbells, resistance bands, barbells etc.
Grab one or two dumbbells. Hold the weight in front of you against your legs. Slowly begin your hip hinge pausing when you feel a stretch in your hamstrings.
Your shoulder blades should be pulled back and engaged.
At this point your torso should be near or parallel to the floor, the knees bent ever so slightly and the weight still close to your legs. Reverse the movement and pull into an upright position.
Perform 2-3 sets of the exercise with 6-10 repetitions depending on your goals.
Tip: keep the weight close to your body. Allowing it to swing down from your arms causes you to round the upper back and places much more (unwanted) tension on the low back
The Biggest Mistakes With The Hip Hinge Movement Pattern
There are two main areas in which form breaks down with beginners when learning how to hip hinge.
Unfortunately, these breakdowns can cause the movement to go from beneficial to an injury risk depending on the load.
This is why it is crucial for moms to perfect the movement of moving the hip joint without weight (or kids) until it becomes second nature.
Initiating With A Squat
A hip hinge is a hip movement. Meaning, the first step is to sink the hips backward, not bend the knees.
When beginners are learning, they often allow their bum to move toward the floor (not to move backwards).
How to fix it: practice by performing your hip hinge about 3 inches away from a wall. As you start to hinge, sink backward and tap your bum to the wall. This gives immediate feedback to help you correct the movement pattern.
Rounded Back
When learning how to hip hinge you need to keep the upper and lower back very flat. As a neutral spine, and the back muscles engaged.
Many moms naturally allow their back to come into flexion (rounding) and thus end up looking like a ragdoll (see image below). This puts unnecessary pressure on the low back- which is exactly what we're trying to avoid.
How to fix it: to fix this, practice the dowel drill. If the dowel loses contact with any of the three points, you've rounded your back.

Letting Arms Drift Forward
Once you master the movement, you will most likely move on to using some sort of weight or resistance.
However, if your arms are straight down from your shoulders, this places the weight too far forward and can hurt your back.
How to fix it: when you're learning and practicing, keep the palms against your thighs. this helps you keep the weight shifted backwards and engage the back of the body muscles.
Hip Hinge Exercises
As a crucial exercise to prevent low back pain the basic hip hinge is an important tool in your workout arsenal. It is also the base for many other exercises that target the posterior chain.
These hip hinge exercises all strengthen the back of the body and utilize the hip hinge movement to do so.
- cable pull through
- standing band hip thrust
- bentover row
- band deadlifts
- kettlebell swing

Other Fitness Tips You'll Need To Smash Results
- A Mom’s Ultimate Guide To Working Out At Home
- Unilateral training for strength
- Best bodyweight exercises for moms
- Posterior exercises for moms
- Workout finishers you need
- 6 exercises to target glutes
- Glute training 101
- Glute activation exercises
- Follow along home workouts
- Fitness tips
Stronger glutes = less back pain, better posture, more power.
This no-gym workout plan builds serious strength in just minutes a day.

Frequently Asked Questions About Hip Hinges
Learning to hip hinge allows you to strengthen the core muscles and the muscles of the back of the body. These muscles need to work together to help improve posture and perform daily tasks. Thus, the hip hinge helps you get stronger, reduce injury risk, and improve your day to day tasks.
The hip hinge primarily works the muscles of the posterior chain, or the "back of the body". These muscles include the glutes, hamstrings, low back, and more. Strengthening these muscles helps reduce your risk of injury.
If your back is hurting in a hip hinge it's most likely because you're not in the proper position. If you've rounded the upper or lower back, or if you've shifted the weight too far forward, it will cause discomfort in the muscles of the low back. To correct this, practice the movement with a dowel until you nail down the pattern.

Learning how to break at the hips is a busy mom staple. Both from training and from a parenting perspective. Using this movement pattern will help prevent back pain, improve posture, and keep you strong enough to play with your kids.


angela @ happy fit mama says
Hinging at the hips is so hard for a lot of people to get! Great tips!
fitasamamabear says
Most people definitely struggle.. but you really do need it to protect the back!
Belinda says
Great tips! I'll give this a go
fitasamamabear says
God luck!
Mel says
I'm going to have to give this a try at the gym! My back definitely needs strengthening and this could be just the ticket! Thanks for sharing
fitasamamabear says
This is definitely a good start! Master the movement and then work up to strengthening it 🙂
elizabeth says
These are some of my favorite exercises for lower body! It's so important to have a strong lower body. Awesome for sharing!
xo elizabeth |
fitasamamabear says
Wahoo! Glad you love the exercises. I LOVE training posterior chain period but especially low body- so important!
Divya: Gone With A Whim says
This is so helpful. My family has a history of weak backs and my job involves me sitting in front of the computer 24/7 so these exercies will definitely help me out a lot. Thanks so much!
fitasamamabear says
Glad you can make use of them!
Janette says
Great article, It's definitely super important for us to maintain strong backs. I am a big fan of anything that keeps a mum bold beautiful and blissful and this certainly hit home for me 🙂 Glad I found your post.
fitasamamabear says
Thanks for the kind words- yes it is important to keep up strong backs.. little ones get heavy! Thanks for dropping by 🙂
Angie says
Great job with the step by step pictures. That is always really helpful . 🙂
fitasamamabear says
Thanks! I'm a visual learner so I try to throw them in 🙂
Deena | Divine Art of Homemaking says
Great post, I am going to try these in my workout tomorrow. I definitely need to strengthen my lower back after five kids.
fitasamamabear says
Let me know how it goes! And if you need more tips just shout... FIVE?! You. Are. A. Rockstar
Cassie says
I so need to work on this. But ow! Not sure if I have the discipline to follow through. :-/
fitasamamabear says
It seems like such an odd movement at first but makes a huge difference when you master it! Remember to not lock out the knees- thee should be NO pain in the low back when learning- you should feel it in the hamstrings/glutes more 🙂
Pooja Sharma says
That was very informative. Love your site.
fitasamamabear says
Thanks!