

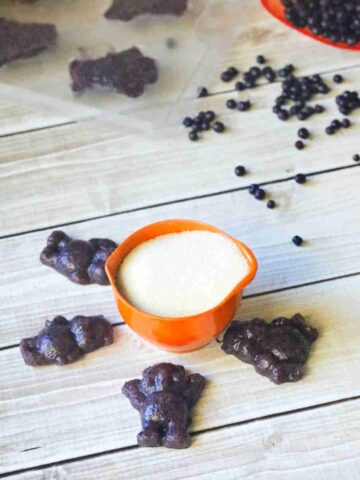
Boost the immune system and fly through cold season with this elderberry cough drops recipe! These DIY cough drops are made with elderberries and honey to help soothe and reduce cough and cold symptoms. Don't buy cough drops, make your own! They're easy to whip up and great to have on hand!

"I tried making my first batch and they really did the trick for soothing my sore throat. Amazing! I couldn't believe I could actually make my own homemade lozenges! Thank you for this recipe!" - Ellie
A Quick Look At The Recipe
- ⏲️Ready In: 10 Minutes prep 2 Hours Cooling
- 👪Serves: 15
- 🍽 Calories and Protein: 26 kcals and 1 gram of protein
- 📋 Main Ingredients: Honey, elderberries, and coconut oil.
- 📖 Dietary Notes: Dairy-free, gluten-free, grain-free, and paleo.
- ⭐ Why You'll Love It: With only 4 ingredients, these throat lozenges help soothe a scratchy throat, boost the immune system and prevent a cold from getting worse.
SUMMARIZE & SAVE THIS CONTENT ON
It’s always ideal to prevent a cough or a cold (with recipes like gut-healing smoothies and homemade fire cider). However, it doesn’t always happen.
This is why having some soothing, gluten-free elderberry cough drops on hand is a winter-time staple (along with these honey and lemon homemade cough drops).
Many people use sambucus zinc lozenges without knowing that sambucus and elderberry are one and the same! Though the sambucus organic zinc lozenges place the focus on zinc as well for healing, these homemade cough drops take a different route.
Made from just three, immune-boosting ingredients (and not one of these is organic cane sugar!), these DIY throat lozenges are sweet to suck on and a natural way to ease a sore or scratchy throat, just like this homemade honey cough syrup.
Essentially, you're making elderberry syrup into individual throat lozenges.
Jump To
💭Why You’ll Love This Recipe
- All-natural
- Allergy-friendly (dairy-free, gluten-free, soy-free)
- Minimal ingredients
- Immune boosting
- Helps to relieve cold symptoms like scratchy throats.
- May reduce the duration of colds
- Delicious
Ingredients You'll Need
These homemade elderberry cough drops are full of immune support and only have three ingredients! This makes them perfect to whip up.
Sources used to write this blog post: health benefits of elderberry syrup, benefits of honey.
Coconut oil: Since you're using these throat lozenges for relief, make sure to grab organic, cold-pressed, extra virgin coconut oil. Basically, the one with the more benefits!
Honey: Because the honey in this recipe is heated, you won't reap as many antibacterial benefits. However, even heated honey is ultra-soothing on the throat. I like to use buckwheat honey as it's been shown to be more antibacterial.
Elderberries: The star of the show for these homemade elderberry cough drops! Normally made into an elderberry cough syrup recipe and taken orally, freeze-dried elderberries tend to work best in my opinion but fresh elderberries could be okay too.
See the recipe card for full information on ingredients and quantities.
Elderberries: The Immune Boosting Ingredient
Elderberries have been a staple for cold and flu season for years and have been said to have some wonderful healing properties.
Benefits like that they’re antibacterial, anti-infectious, and help to boost your overall immune system. Plus, elderberries have been shown to help ease respiratory colds, reduce cold symptoms, and lessen the duration of colds.
They’re used most in elderberry syrup or elderberry gummy bears (though this is a fun no-bake granola bar recipe with them!). However, make sure to use them cooked (in this recipe they’re heated in boiling water and discarded) as elderberries by themselves can have toxic effects.
How To Use The Elderberry Cough Drop Recipe
Just like any other cough drop you simply pop them into your mouth and suck away. However, unlike mass-produced varieties, this one will melt slightly.
Meaning, it is almost taffy-like in nature as it melts which is why they're not recommended for kids. Instead, opt for elderberry kids cough syrup.
The last thing you want to do with these throat lozenges is to chew them. Just suck on them until it fully melts and the honey gloriously coats your throat.
Important Teaching Tips
These homemade throat lozenges require that you heat the honey until boiling while whisking it constantly. This lets the moisture come out of the honey but does not allow it to burn.
In other words, it’s delicate.
While many people use a candy thermometer, you don't need one. Instead, set the timer for 6 minutes after the honey is bubbling and alternate between whisking and removing it from heat to settle (watch the video to get a good idea of how to do this). You want the mixture to turn darker, and after six minutes, it should be much stickier.
You want to keep these homemade throat lozenges in the freezer until you pop them in your mouth. They do melt slightly.
Silicone molds: You need candy molds for these throat drops. However, stay away from the super small gummy bear molds with an eyedropper. They’re cute but horrendous, and you won’t be able to make anything. Instead, get candy molds and keep the cough drops small in size.
Homemade Elderberry Cough Drops FAQs
"Elder" refers to elderberry which have been a staple in cough in cold treatment thanks to their antibacterial benefits and high antioxidant profile. They can be made into elderberry tea, cough drops, elderberry syrup, and homemade gummy bears to reap their perks.
These cough drops are best stored in the freezer. Not only does this hold their shape but it also makes them even more soothing on an inflamed throat.
Elderberry syrup is great for the immune system in general which means you can table a tablespoon daily during cold season. If you feel a scratchy throat coming on, you can take 1-4 tablespoons daily to try to kick it.

Other Cough & Cold Remedies
If you want to keep your immunity and prevent a cough or cold, below are the best steps to take:


Using Bone Broth For Preventing Coughs & Colds
Another way to both fight colds as well as prevent them is to use bone broth! It’s actually one of my most recommended foods for toddlers because it’s so healing. However, making homemade broth takes a lot of time.
However, there is a solution: bone broth powder from perfect supplements (use code mamabear10). This powder works just like any other broth and all you need to do is whisk it into boiling water (or make a crazy, gut-healing chocolate smoothie)
Perfect Supplements uses only the highest quality products and this bone broth powder is free from additives and spices. Plus, it uses grass-fed, organic chickens.

Made from 100% USDA Organic and free-range chickens, this bone broth is a convenient way to enjoy the health benefits of bone broth without time spent in the kitchen. Use code mamabear10 to save money on your next order.
- Is Non-GMO
- Contains Type I, II, and III Collagen
- Just 6% of Your RDA of Sodium
- Is MSG Free
- Is Glyphosate Free
- Contains no toxic herbicides/pesticides.

Homemade Elderberry Cough Drops
Video
Equipment
- Silicone candy molds
Ingredients
- ¼ cup raw honey
- 2 tablespoons elderberries freeze-dried
- 1 tablespoons water boiling
- 1 tablespoons coconut oil
Instructions
- In a small bowl, pour the boiling water over the elderberries, and cover. Let sit 10 minutes to steep.
- Strain the elderberries, and press out all the juice.
- In a small pot, combine the elderberry juice, honey, and coconut oil and heat over medium to high heat.
- Bring the mixture to a bubbling boil (it will foam), remove from heat, and whisk until the bubbles go down. Place back on the heat.
- Repeat this for 6 minutes or until the mixture sits at 300 degrees. The mixture should darken slightly and become a bit more sticky as the honey thickens up.
- Pour the mixture into individual candy molds, keep them fairly small. Place in the freezer to set (and store there).
Notes
- These homemade throat lozenges require that you heat the honey until boiling while whisking it constantly. This lets the moisture come out of the honey but does not allow it to burn.
- In other words, it’s delicate.
- While many people use a candy thermometer, you don't need one. Instead, set the timer for 6 minutes after the honey is bubbling and alternate between whisking and removing it from heat to settle (watch the video to get a good idea of how to do this). You want the mixture to turn darker and after six minutes it should be much stickier.
- You want to keep these sore throat lozenges in the freezer until you pop them in your mouth. They do melt slightly.
- Optional add ins: cinnamon, ginger, and cloves make for a tasty and healthy flavor swap.
Disclaimer:
Nutrition values are estimates only, using online calculators. Please verify using your own data"


sLIDESHARE dOWNLOADER says
Thanks for sharing this recipe! I'm always looking for ways to soothe my children's coughs during cold season, and these elderberry cough drops sound like a game-changer. Can't wait to give them a try!
fitasamamabear says
Right?! It's so easy and you feel good about giving them!
Gwen says
I use the store bought elderberry cough drops. This was an easy way to make them homemade.
fitasamamabear says
They're both great to have on hand!
Mary says
I just made some of these as we have a cough going around our house (yay, cold and flu season!). They worked great and weren't too hard to make. I appreciated your tips, too!
fitasamamabear says
It's nice that they're simple right?
Ellie says
I tried making my first batch and they really did the trick for soothing my sore throat. Amazing! I couldn't believe I could actually make my own homemade lozenges! Thank you for this recipe!
fitasamamabear says
Happy to hear you loved it! They're so easy.
Hanna Long says
Love this recipe. I use it every season! Such an easy way to boost the immunity
fitasamamabear says
Happy to hear you loved it!
Cindy says
These work great for a sore throat and they were easier to make than I thought. I made a big batch and will keep them in the freezer for the upcoming cold and flu season.
fitasamamabear says
They're such a staple for the season!
Tv Schedule says
I love these elderberry cough drops! They work great and are so easy to make. Thanks for the recipe!
fitasamamabear says
Ah this makes me so happy! We use them a lot, great to have in the freezer!
Kaylee says
Oh that's a good trick about letting the honey bubble for 6 minutes. I will definitely need to try that because I've also had some struggles with the candy thermometer and getting everything just right. This recipe looks great! Thank you for sharing!
fitasamamabear says
Yes! It took a lot of batches of burned honey with a candy thermometer to quit haha I cannot for the life of me get it to work. I find it SO much easier to just stay on top of it and remove it from heat back and forth.